Welcome to this in-depth review of the Divi Masonry Gallery plugin, designed to upgrade Divi websites with dynamic and visually appealing photo galleries.
With web design constantly evolving, this plugin aims to add responsive, engaging elements to your site, offering a customizable masonry gallery that integrates well with Divi.
The purpose of this review is to give you a straight-up, detailed look at the Divi Masonry Gallery plugin.
I’ll dig into how it works, its design flexibility, and what it really brings to the table for Divi users.
Given its advanced gallery features, It’s important to compare how it performs against the typical Divi image modules and determine if it’s a valuable tool for your web design toolkit.
Having designed numerous websites using the Divi theme, I have extensive experience with a range of Divi plugins and similar gallery tools.
This experience has sharpened my ability to spot what works and what doesn’t in web design tools. I’ve seen what different gallery plugins can do, along with their ups and downs.
This background will shape my review of the Divi Masonry Gallery, aiming to give you practical, well-grounded insights.
Join me as I explore the Divi Masonry Gallery, from setup to its practical use on a live site.
The Divi Masonry Plugin is created by Destaca Imagen and with this plugin, you can easily create beautiful masonry galleries. This is a very popular plugin with over 4.500 sales on the Elegant Themes marketplace.
In this section, I’ll guide you through the installation and setup process for this plugin. I’ll also delve into creating a masonry gallery and explore some of the advanced features available.
See the pricing section for a 10% discount coupon for this plugin.
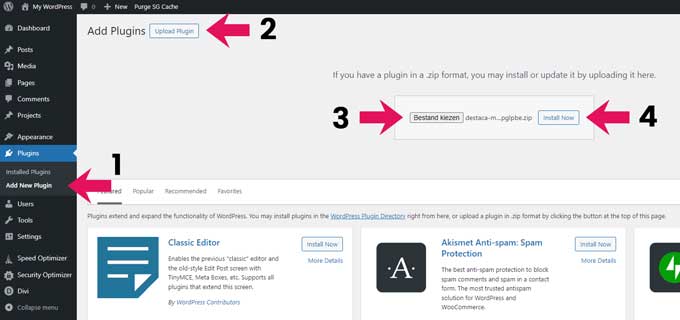
From your WordPress dashboard navigate to Plugins and click on Add New. From here click on Choose File and locate the Divi Masonry plugin on your computer, then click on Install Now.
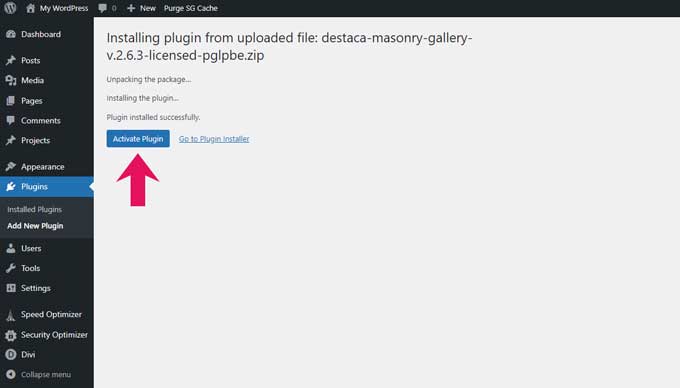
After the installation is completed, click on the Activate Plugin button to activate the plugin.
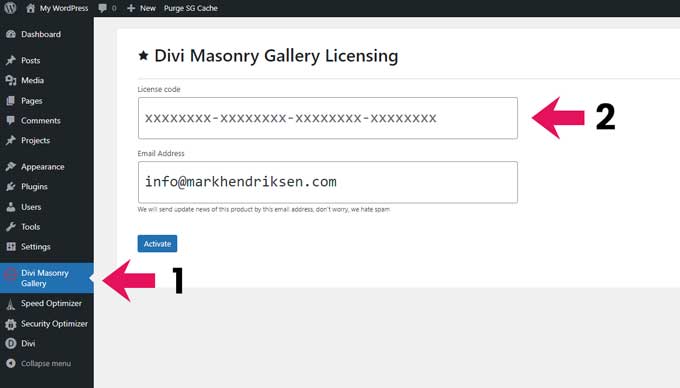
From here navigate to Divi Masonry Gallery and you can place the license code in the field and then click on the Activate button.
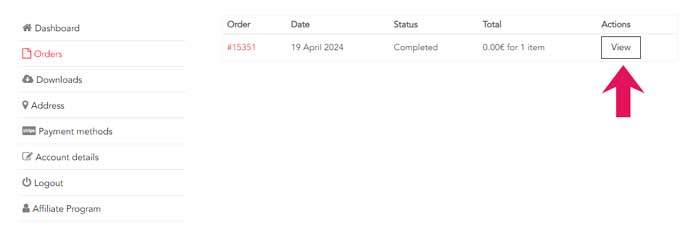
To find the license code, head over to the My Account page on their website.
Go to Orders and click on the View button.
Under your product license codes, you can find and copy the license code and paste it into the license code field of the plugin.
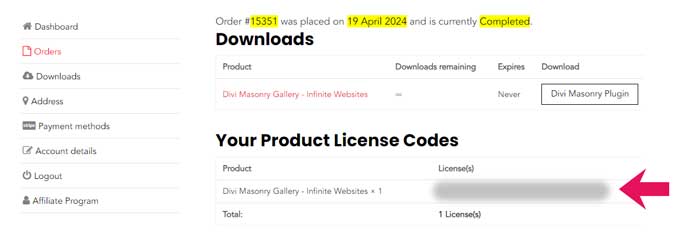
The plugin is now installed and activated, in the next chapter, I will be going to create a masonry gallery.
Now that the plugin is installed, you will have an extra module available in the Divi Builder.

You can place this module on any of your pages.
Let’s explore the settings of this plugin.
I start with the Content tab in the Masonry Gallery Settings.
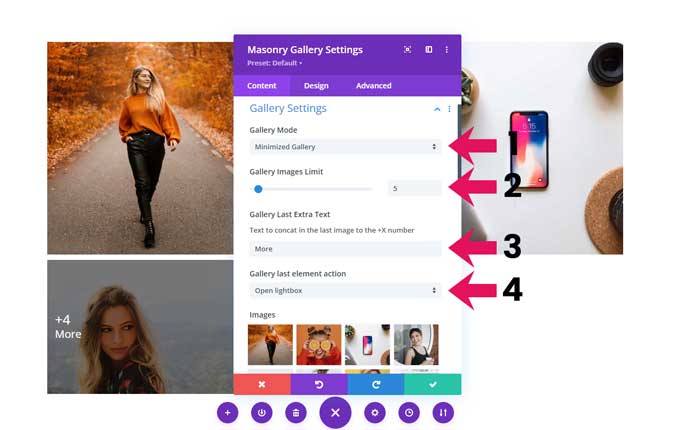
Under Gallery Mode, you can choose between Normal or Minimized Gallery (1).
With the minimized mode you will get some extra options for your gallery.
Gallery Images Limit: here you can set the number of images that will be shown in your gallery (2).
Gallery Last Extra Text: you can add a text after the number (3).
Gallery Last Element Action: with the last image, you have the option to either open a lightbox or navigate to a different page.
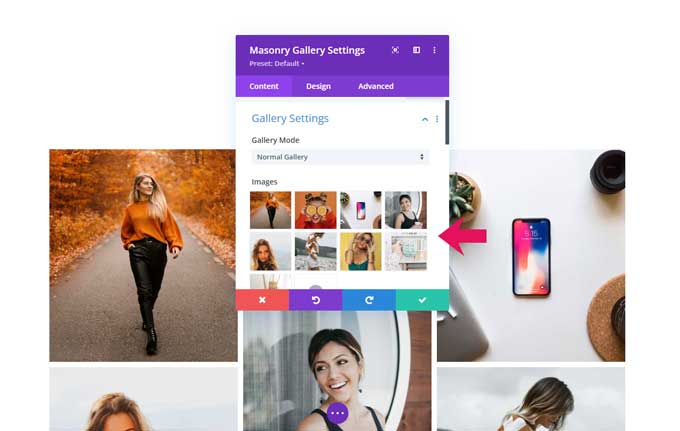
Under the images section, you can add pictures to your gallery. You can easily rearrange the order of the images by dragging and dropping them.
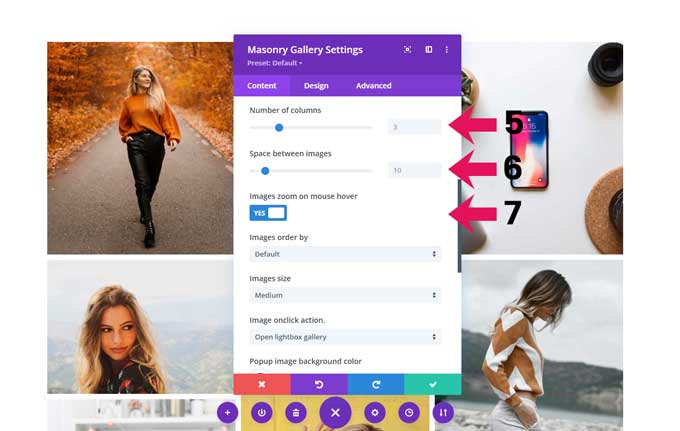
Here you can adjust the number of columns for your gallery (5). You can set different numbers of columns for mobile, tablet, and desktop.
You can also change the space between the images (6). You can set different spaces for mobile, tablet, and desktop.
You can enable Images Zoom on Mouse Hover to give the images a zoom effect when you hover over them (7).
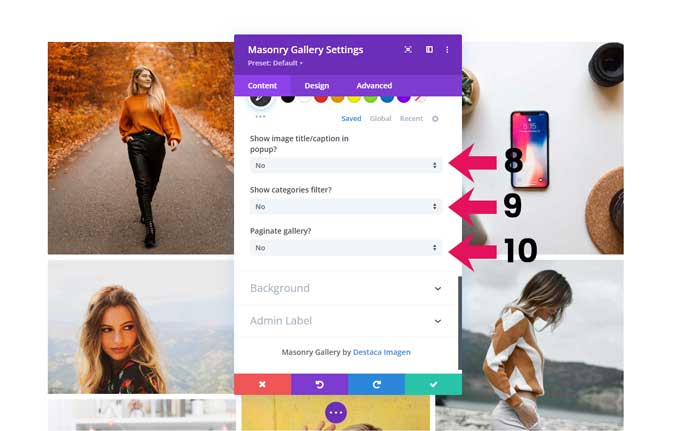
You can choose to show an image title or caption in the popup (8).
Here you can enable the Category Filter (9).
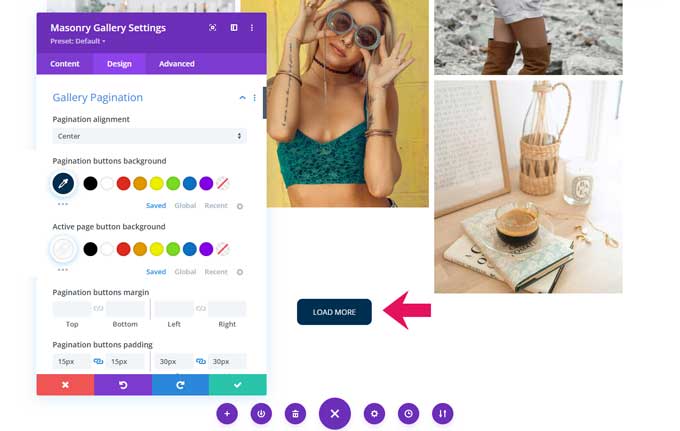
You can enable a pagination for your gallery (10).
In this section, I will cover how you can further customize the styling of the masonry gallery.
When you navigate to the design tab you will find many customization options:
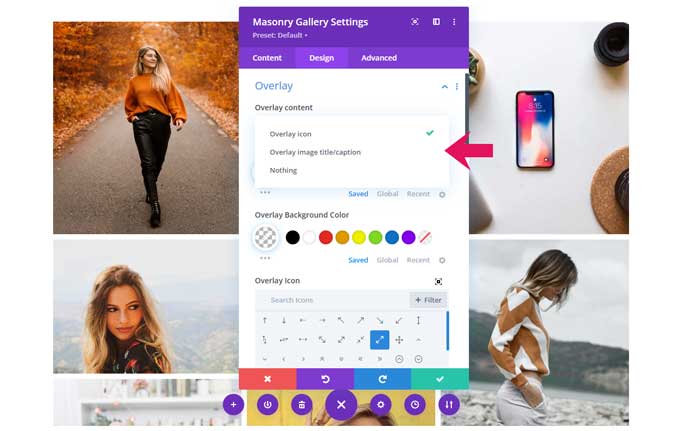
Within the Overlay Content settings, you have the option to select either an icon overlay or to display a title/caption overlay when hovering over an image.
Once you select the “Overlay icon” option, you have the ability to customize the icon’s color.
By selecting the “Overlay image title/caption” option, you have the flexibility to customize the font type, size, weight, and style.
You can also set a background overlay color for your images.
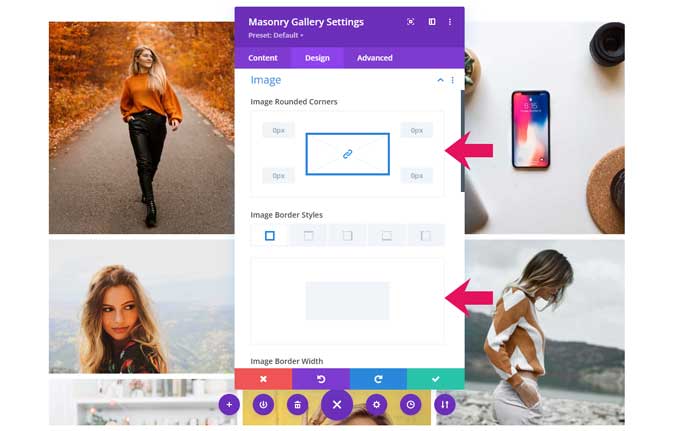
Within this tab, you’ll find various options for images including the ability to create rounded corners and add borders.
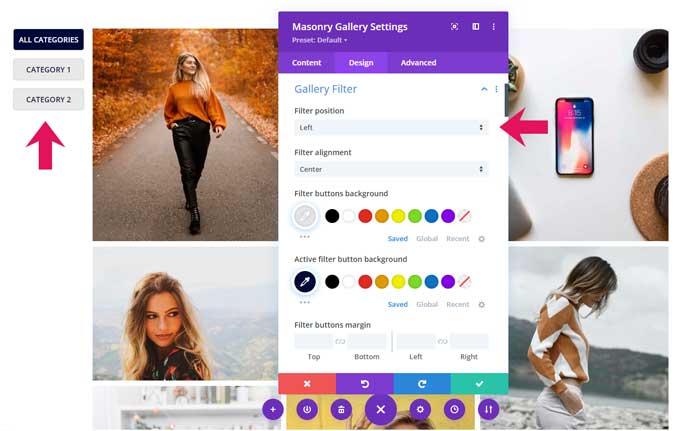
Under this tab, you’ll find more than 30 design options, allowing you to customize settings for both the active and inactive buttons.
Some of them are:
The image below showcases the gallery filter, which I have aligned to the left side; however, it can also be positioned at the top or bottom.
Just like the gallery filter, you will have all the design options for the gallery pagination.
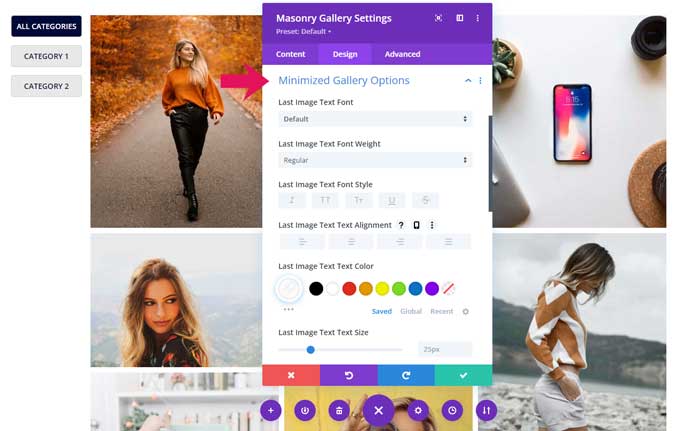
Here, you’ll find all of the design choices for the minimized gallery mode, including options for text font, style, weight, alignment, and color schemes.
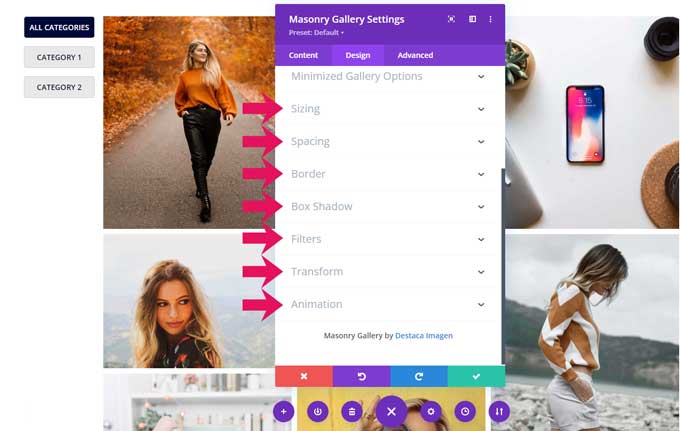
This plugin contains all the standard design options you will find in any Divi plugin, including:
The gallery masonry plugin also comes with some advanced options which I will cover here.
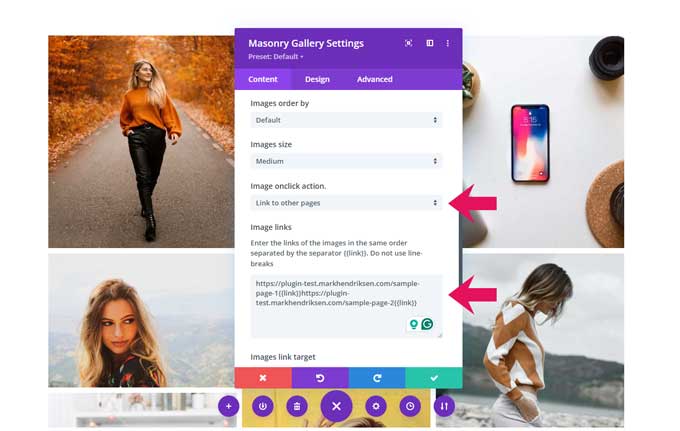
You can do this by setting the option Image Onclick Action to Link To Other Pages.
Then you can place a destination URL in the Image Links field, separate this by {{link}}, and place another link for the second image in your gallery.
The order of the destination links is the same as the images in the gallery.
Another nice feature of this plugin is that you can create a filterable navigation.
I will demonstrate how you can do that.

To create a filterable navigation, you first need to create filter categories.
You will find a new option under the Media tab, Media Categories.
Here you can create categories for your gallery.
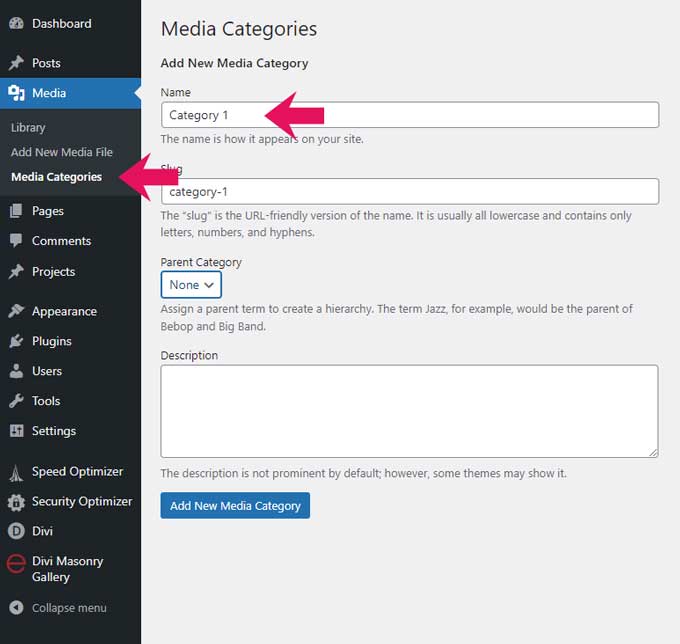
When your categories are created you can assign them to an image in your Media Library.
Open an image and you will find the option Edit More Details.
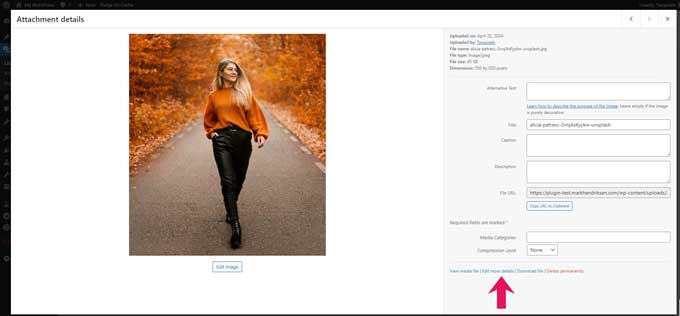
From here you can assign the image to a category.
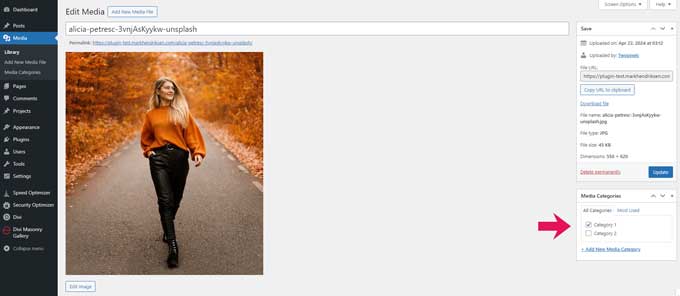
When the images are assigned to a category you can hop back to your Gallery Masonry Plugin.
Set the show Categories Filter to yes and you can select the categories you want to show.
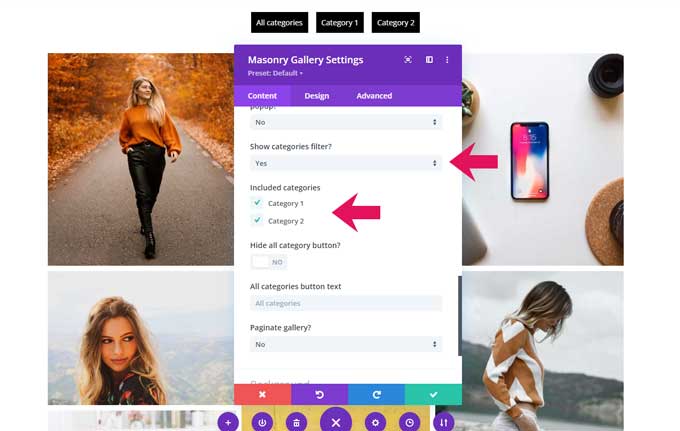
You can create some beautiful masonry galleries with this plugin. I will show you some of the galleries that you can create.
This example features a structure with 3 columns and includes top category navigation styled as buttons.

This example features a layout with two columns and pagination at the bottom. Each image includes a descriptive caption.
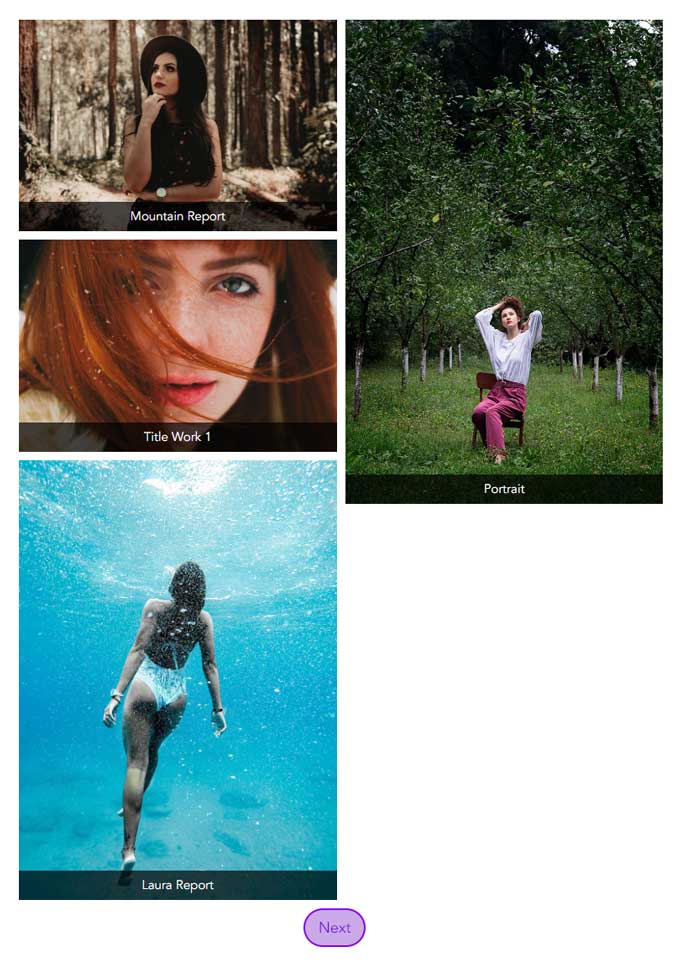
This is an example of a minimized gallery. This gallery is set up in a 5-column layout, limited to displaying 9 images at a time. You can click “Load More” to view additional images.

I have explained how to install and customize the Divi Gallery Masonry plugin. And I also covered some advanced settings such as creating a filterable navigation and linking each image to a separate page.
But how does this plugin affect the performance of your website?
For comparison, I created a page with 9 image modules to compare the loading time with or without the Gallery Masonry plugin.
The tests are done with the following criteria:
The below image is the result of a page with 9 image modules with the same images used in the gallery.

Test results with the Divi Gallery Masonry plugin activated.

The images show that even though the page size is a bit larger, it now loads faster.
I will compare the Divi Masonry Gallery plugin to the popular Essential Grid plugin by ThemePunch. You’ll discover that while they address slightly different requirements, both are designed to improve the visual content of a website.
In summary, your choice between these two should depend on your specific needs:
This plugin has an impressive average star rating of 4.5 out of 5, earning a lot of positive feedback for its simplicity and user-friendliness.
Users particularly like how well it integrates with the Divi theme, and its responsive design and customization options also receive high marks.
The Divi Masonry Gallery plugin is a great choice for those who need an elegant, simplistic solution for showcasing visual content. It is particularly suitable for Divi theme users looking for a quick and easy way to add masonry galleries to their website.
Let me know in the comments what you think about this plugin.