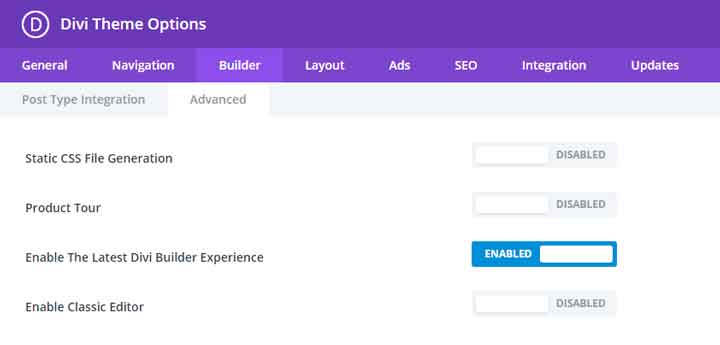
In Divi > Theme Options > Builder > Advanced I disabled Static CSS File Generation and Product Tour.
Optimize Your Images
Optimizing your images is all about reducing the size of the image while maintaining the quality. Doing this will reduce the size of your page significantly, which will lead to faster loading times. There are great plugins or tools that can help you do this, including:
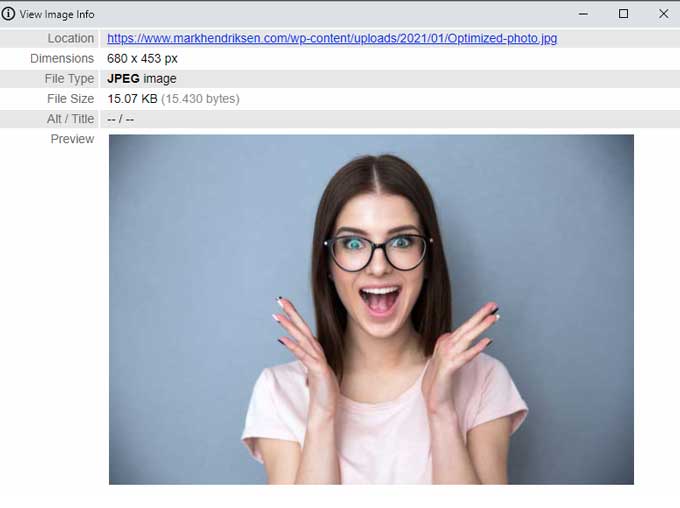
Let’s see how you can optimize an image and how much space it can save. To show you how this is done, let’s optimize the image below. The original size of the image is 1.9 MB, but once we optimize it, it will be reduced to only 15.07 KB and it will have the same quality.
I can reduce the size of the image even further by reducing the original dimensions from 1999x1333px to 680x453px by using Photoshop or any other photo editing program. Thanks to all these changes, my image size went from 1.9 MB to 15.07 KB. The first thing I do is drop this 1.9 MB image into tinypng which provides a huge saving of 92% by lowering the image size to 145.5 KB.
Using plugins like ShortPixel or Imagify will allow you to automate the process I explained above and all the images on your site will be optimized automatically. For a more comprehensive selection, don’t miss Elegant Themes’ expertly curated roundup of the best image optimization plugins. This resourceful list ensures you find the perfect plugin to enhance your website’s visual appeal and performance.
Plugins
Does the amount of plugins you use impact the performance of your website? The answer is yes and no. More plugins installed means more requests and a bigger page sizes, but there is a way to disable plugins on a page/post basis with a script manager plugin. When you want to install a new plugin, you should always ask yourself the following question: Do I really need this plugin or can I code it myself?
Let’s say you are using Google Analytics in Divi and you have a plugin that helps you insert the tag. However, you can easily copy that tag from the Google Analytics dashboard and paste it into Divi > Theme Options > Integration. If you do this, you won’t need that plugin. When you install a new plugin, check the GT Metrix waterfall chart to see if it doesn’t slow down your website too much. Some plugins are badly coded and can really slow down your site, so you need to keep an eye on that.
Use a Script Manager Plugin
Now, don’t get me wrong. You do need plugins for your website, but you probably don’t need every single plugin to be activated on each page. When you activate a plugin it will be loaded on each page of your website even if you are not using its functionality on that page. Let me explain…
I’m using the following plugins on my test website:
- WooCommerce
- Social Warfare (social share plugin)
- Divi Supreme
- Nextgen Gallery
- Contact Form 7
- Yoast SEO
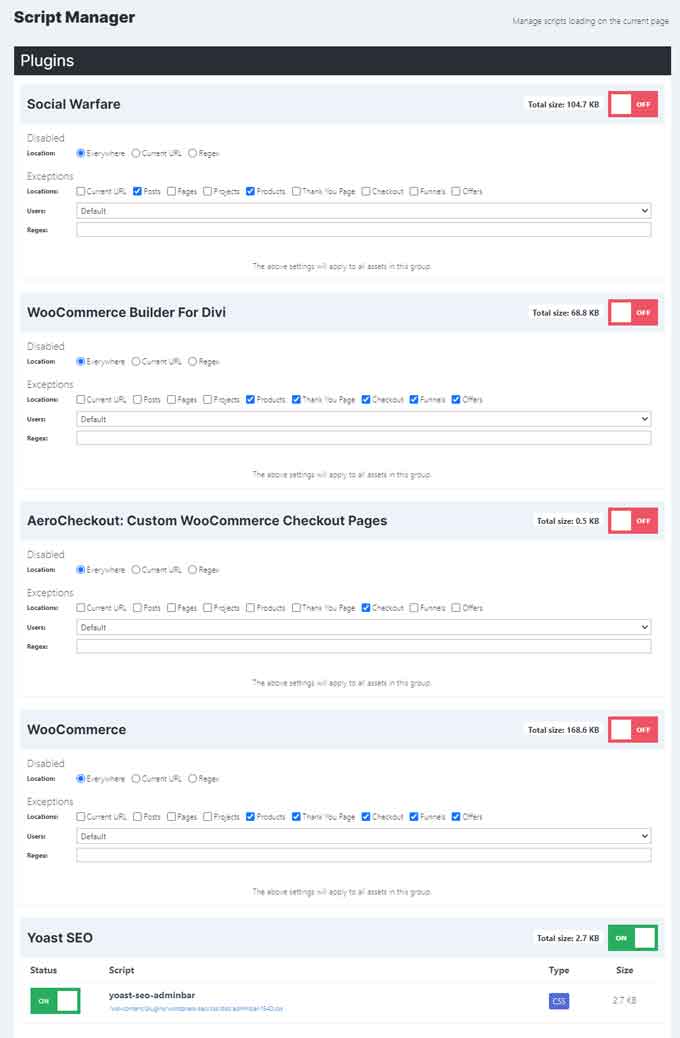
The only plugin that I actually need for the home page is Yoast SEO, but all the other plugins still load (except for Divi Supreme) even if I’m not using them on the home page. So, how can you disable plugins on a page or post basis? Well, you can use a script managers plugin like Perfmatters or Asset CleanUp. I am using Perfmatters and when I open the script manager for the home page I can disable the plugins that don’t need to be loaded. Instead of having 5 plugins loaded on one page, I can just have the one I need. Imagine that you have 30 or more plugins installed. With a script manager, you can disable them per page/post and this can reduce your page loading speed significantly. This website has 35 plugins installed, but with Perfmatters I can disable them on pages I do not need them.
Perfmatters is a paid plugin but it provides additional optimization options. These are the settings that I use in Permatters General tab: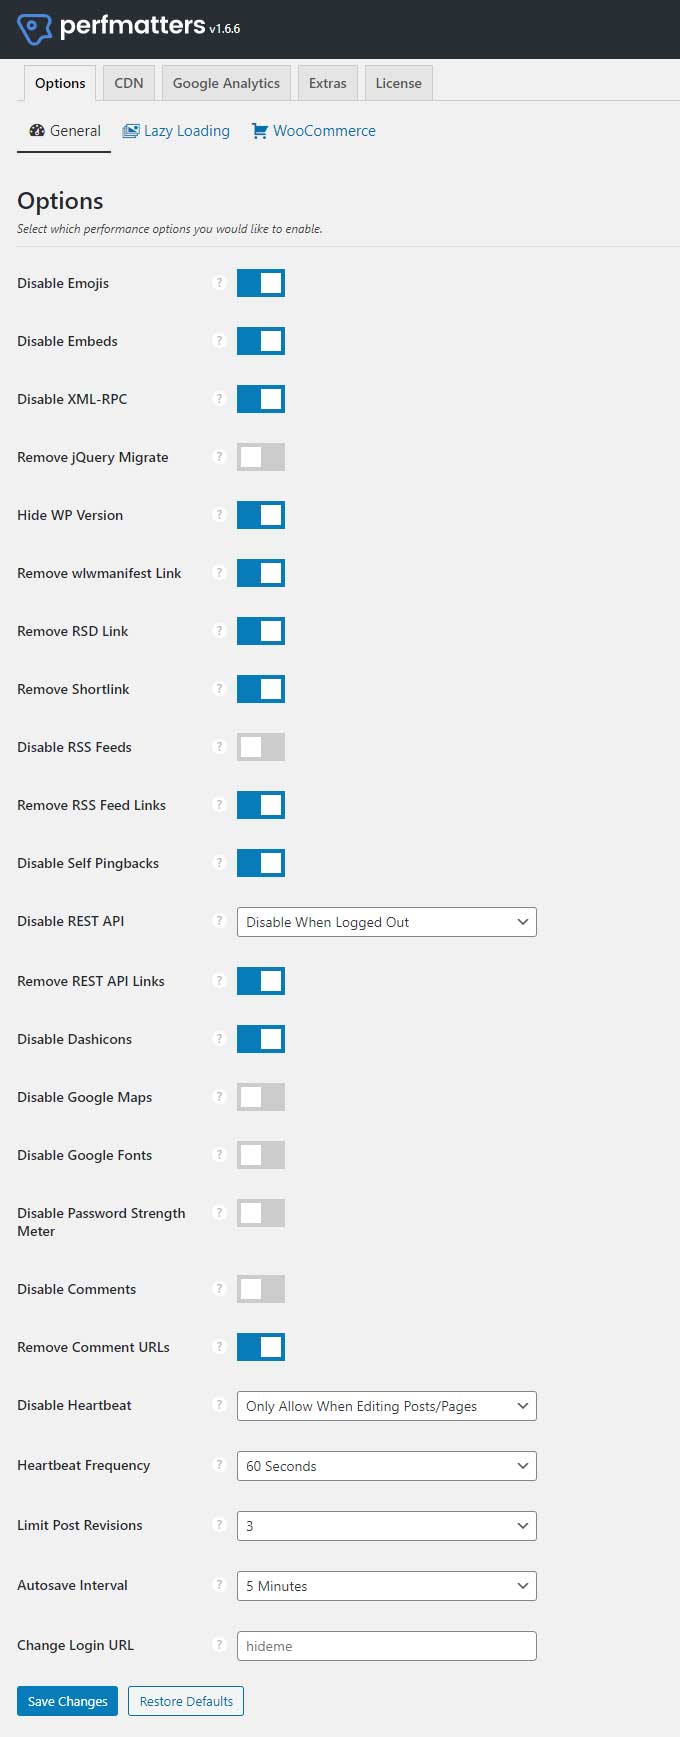
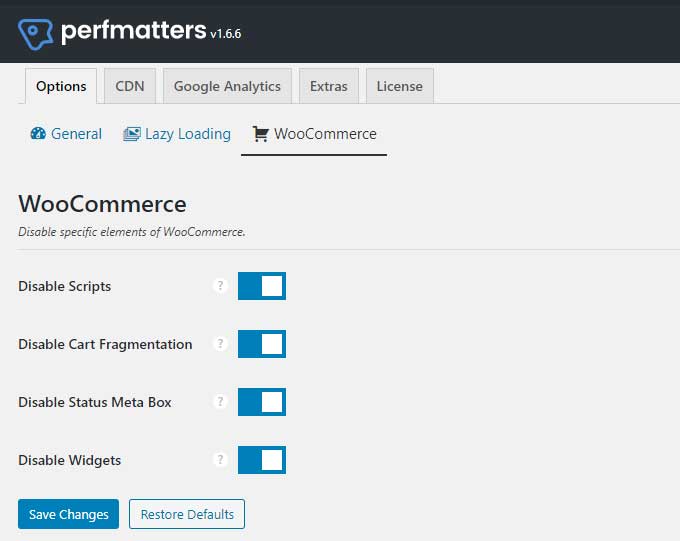
I am using WooCommerce so in the WooCommerce tab I use these settings:
Caching
Caching is very important to speed up your website. With caching you will be able to store a copy of your web page in a temporary caching location so it can be accessed by the end-user more quickly.
There are 2 types of caching:
- Caching at the server level
- Caching with a plugin
Catching at the server level means your hosting provider will handle the caching for you, as long as they provide that service. My test website is hosted by SiteGround and they have their own caching plugin for their customers. For the purpose of this guide, I’m using the plugin WP Rocket because it doesn’t only handle caching, it also provides many more optimization options, which I’ll explain later in this guide. If you are already on SiteGround then I do not recommend using WP Rocket but instead, use their SG Optimizer plugin. Check out my comparison between WP Rocket and SG Optimizer. Just install and activate WP Rocket on your site and it will start caching. You can also try W3 Total Cache, which is free.
File Optimization
There are many different issues that can affect your speed test results and in this section of the guide, we are going to address and solve the most common issues.
Including:
- Minify CSS and JavaScript
- Combine External CSS and JavaScript
- Eliminate Render-Blocking JavaScript and CSS
- Lazy-load Images and Videos
- Enable Preloading
Minify CSS and JavaScript
Minification will allow us to remove all the white space and comments from the CSS and Javascript files. This will help us reduce the size of the files.
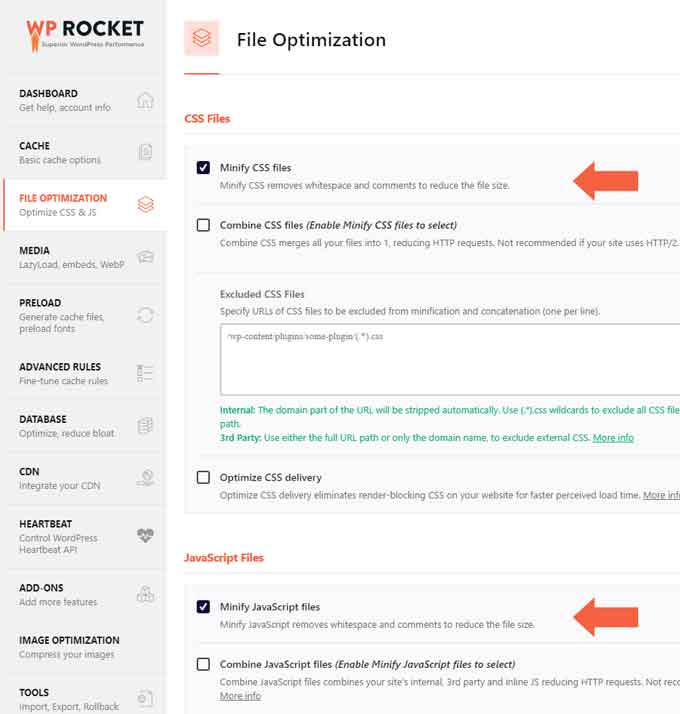
Go to WP Rocket and click on the “File optimization” tab so you can check Minify CSS Files and Minify JavaScript Files and the plugin will do this for you.
If you’re looking for a free solution, you can check out Autoptimize.
Combine External CSS and JavaScript
To reduce requests on your page, you can combine the CSS and Javascript files. It’s not recommended that your hosting is running on HTTP/2 because files can load at the same time. Click here to check if your website is running on HTTP/2.
In WP Rocket, you can combine the files in the “File optimization” tab as well. The option is right under Minify CSS Files and Minify JavaScript Files.
Eliminate Render-Blocking JavaScript and CSS
You will get this warning when files are keeping the page from loading as fast as possible.
In WP Rocket, you need to go to the “File Optimization” tab and check Optimize CSS Delivery and Load JavaScript Deferred.
For a free solution check out Autoptimize and Async JavaScript.
Lazy-load Images and Videos
Lazy-loading means that the images and videos on a page will only be loaded when the user scrolls to where the image or video is located on the page.
To enable lazy loading in WP Rocket, go to the “Media” tab and check enable for Images. If you have Iframes and videos on your page, you can also enable that option.
I also enable “Add missing image dimensions” because it can reduce the cumulative layout shift on the site.

For a free solution, you can try the a3 Lazy Load plugin.
Enable Preloading
If you enable preloading, you will be able to load certain files early on. I have activated the cache preloading on my page and I can check that option because I’ve installed SEO Yoast as well.
On the “Preload Links” section, make sure you check the “Enable Link Preloading” option. This is an amazing feature and even though it will not increase your speed rating, it will create the feeling the page is loading instantly. It also improves the perceived load time by downloading a page when the user hovers over the link.
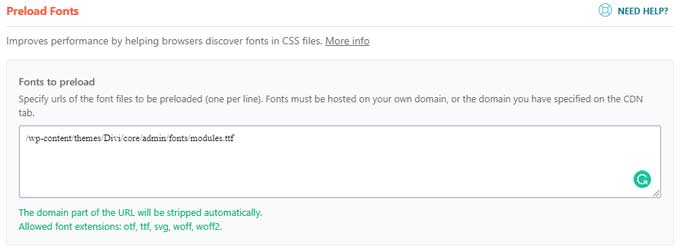
If you are hosting fonts locally on your server, you can preload them in the “Preload Fonts” tab and use them on your site.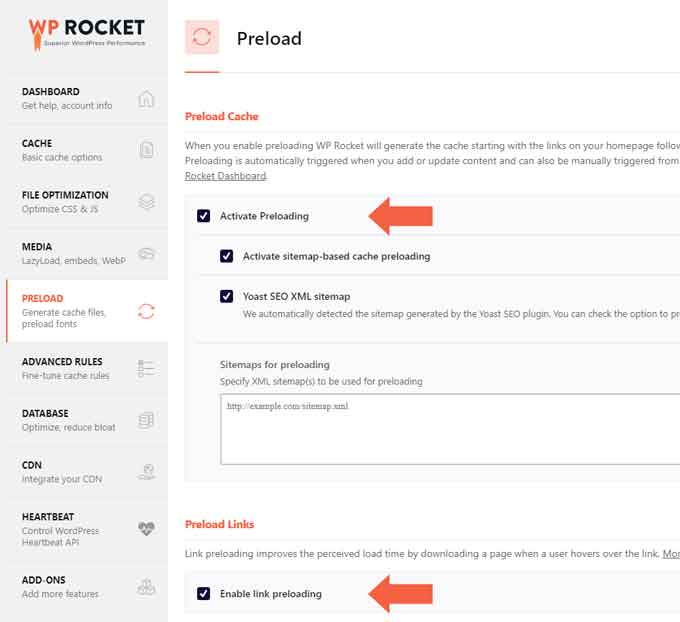
Under preload fonts you can assign the fonts that need to be downloaded right away to avoid render-blocking.
You might get this waring in Google page speed:
To solve this add this in the preload fonts field:
/wp-content/themes/Divi/core/admin/fonts/modules.ttf
Hosting and CDN
Good hosting is an absolute must if you want your site to perform well and have good speed. I can recommend SiteGround, Kinsta and Cloudways because I’ve used them a lot and I have a lot of experience with these hosts. I use SiteGround for most of my websites, and Kinsta for websites that need a better performance, such as this one.
CDN is short for Content Delivery Network and it’s a network of servers around the world that stores a copy of your website. For example, if your hosting is in the US and someone from England visits your site, they will be redirected to the closest server available instead of the US server so the page can load a lot quicker.
Final Thoughts
Improving the speed of your Divi website is not difficult to accomplish once you know what you should do. That’s why I created this simple guide and I hope it can be useful to you! The steps are super easy to follow, which proves that you don’t have to know how to code to improve the performance of your site. You only need a good guide and the right tools, so don’t hesitate to give this a try and make your site the best it can be.